Website Backup Guide

Regular backups are essential for website security and recovery. This guide covers backup strategies and step-by-step instructions for backing up your website files and databases using common hosting tools.

Understanding Website Backups

A complete website backup consists of two components: your website files and your database (for dynamic sites like WordPress). Both are essential for fully restoring your site if problems occur.

Initial Backup

Once your website is launched, create an initial backup to preserve the original version. This serves as your baseline that you can always return to if needed.

  • Back up all website files from the public_html directory
  • For CMS websites (WordPress/Joomla), also back up the database
  • Store copies locally and in cloud storage (Dropbox, Google Drive, etc.)
  • Consider keeping an offline copy on external media

Routine Backup Schedule

Establish a regular backup routine based on how frequently your site changes:

  • Daily: E-commerce sites or frequently updated blogs
  • Weekly: Active business sites with regular content updates
  • Monthly: Static sites with occasional changes
  • Before/After Updates: Always backup before WordPress or plugin updates

The 3-2-1 Backup Rule

Follow this best practice for backup redundancy:

  • 3 copies of your data (original + 2 backups)
  • 2 different storage types (server + local, or server + cloud)
  • 1 offsite backup (cloud storage or physical media stored elsewhere)

Backup Naming Convention

Use clear naming for easy identification: sitename_YYYY-MM-DD_type

Example: mywebsite_2025-01-15_full.zip

Important: Many hosts offer backup services, but these often cost extra for restoration. Maintaining your own backups gives you immediate control and avoids restoration fees.

Backing Up via FTP

FTP (File Transfer Protocol) provides direct access to download your website files. This method works with any hosting provider.

Recommended FTP Client

FileZilla – Free, reliable, and cross-platform FTP client
→ Download from: https://filezilla-project.org/

Note: Download the “Client” version, not “Server”

FileZilla Setup

  1. Install FileZilla Client on your computer
  2. Open FileZilla and click “File → Site Manager”
  3. Click “New Site” and enter your connection details:
    • Host: Your domain or IP address
    • Port: 21 (or as provided by your host)
    • Protocol: FTP or SFTP
    • User: Your FTP username
    • Password: Your FTP password
  4. Click “Connect”
FileZilla Interface

Downloading Your Files

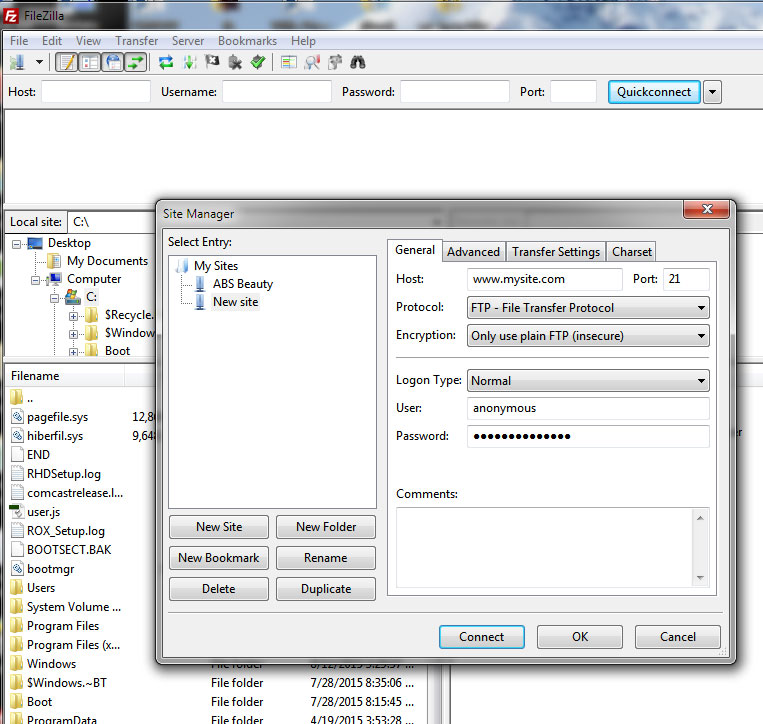
Once connected, you’ll see two panels:

  • Left panel: Your local computer files
  • Right panel: Your server files

To backup your website:

  1. Navigate to your backup folder on the left (local)
  2. Navigate to public_html on the right (server)
  3. Select all files in public_html (Ctrl+A or Cmd+A)
  4. Right-click and choose “Download”
  5. Wait for all files to transfer
Tip: For large sites, consider using your host’s File Manager to create a zip file first, then download the single compressed file via FTP for faster transfer.

Using cPanel Backup Wizard

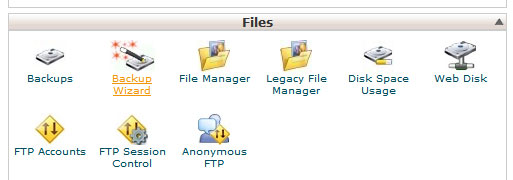
cPanel provides built-in backup tools that are faster and more convenient than FTP for most users.

Accessing cPanel

Login to cPanel using one of these methods:

  • Go to: yourdomain.com/cpanel
  • Or use the cPanel URL provided by your host
  • Username/password are typically the same as FTP credentials

Using the Backup Wizard

Once logged in, locate and click the “Backup Wizard” icon:

Backup Wizard Icon

Step-by-Step Backup Process

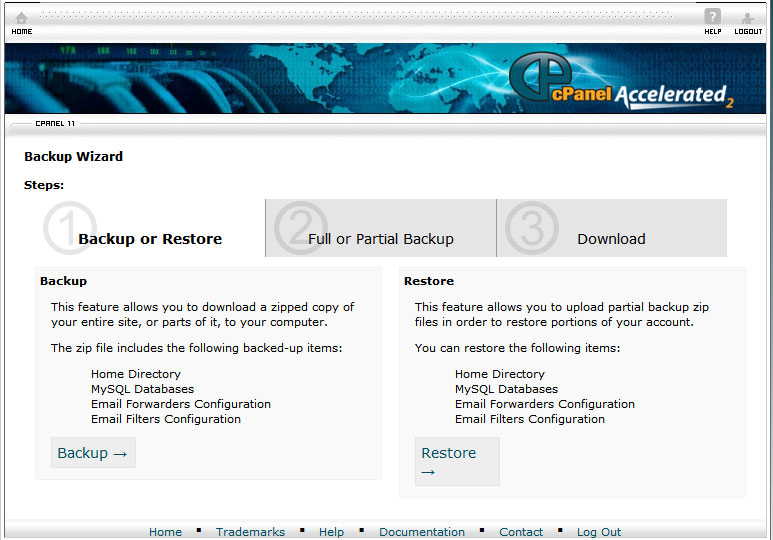
Step 1: Choose Backup Type

Select “Backup” (not Restore) from the main screen:

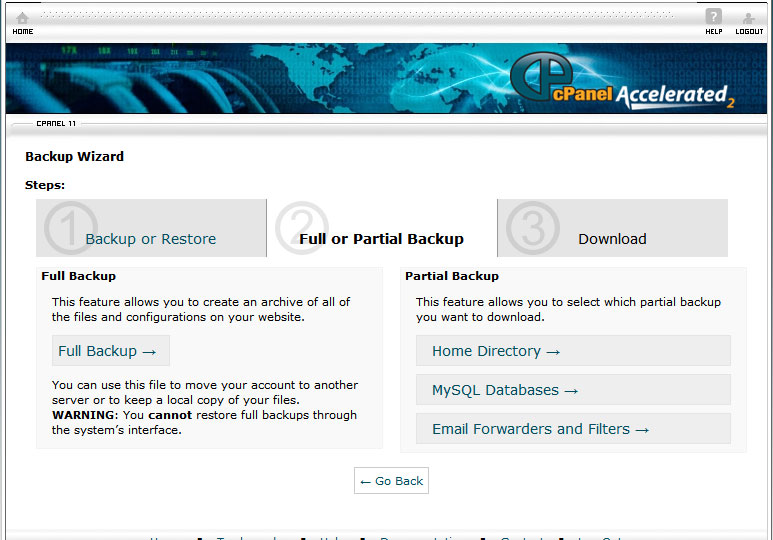
Step 2: Select Partial Backup

Choose from the “Partial Backup” options on the right:

  • Home Directory: All your website files
  • MySQL Databases: Your WordPress/CMS database
  • Email Forwarders: Only if you use cPanel email

Note: Avoid “Full Backup” – it’s for server migrations, not regular backups

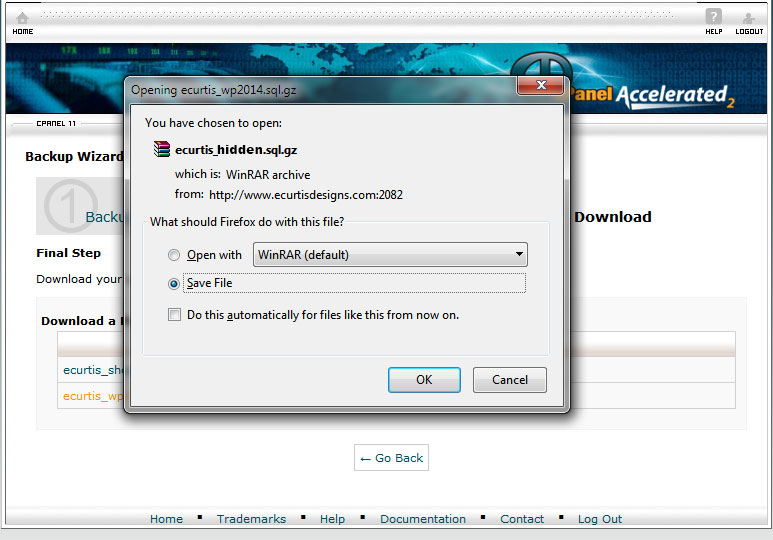
Step 3: Download Your Backups

Click each item to download. Files will save to your Downloads folder.

Visual Guide


Step 1

Step 1: Main Screen

Step 2

Step 2: Backup Options

Step 3

Step 3: Database Download

Step 4

Step 4: Files Download


Alternative: File Manager Method

For large sites or slow servers, using File Manager can be more efficient:

  1. Open “File Manager” in cPanel
  2. Navigate to public_html
  3. Select all files (Ctrl+A or Cmd+A)
  4. Right-click and choose “Compress”
  5. Select “Zip Archive” and name your file
  6. Once compressed, download the zip file

Restoring from Backup

To restore your backups:

  1. Open Backup Wizard
  2. Select “Restore” instead of “Backup”
  3. Choose what to restore (Home Directory or MySQL Database)
  4. Upload your backup file
  5. Click “Restore” and wait for completion

Using phpMyAdmin for Database Backup

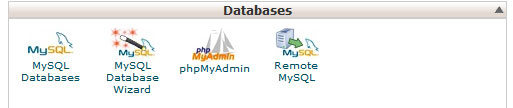
phpMyAdmin is the standard tool for database management and is available on most hosting platforms.

Accessing phpMyAdmin

In cPanel, find and click the phpMyAdmin icon:

phpMyAdmin Icon

Exporting Your Database

  1. Select your database from the left panel
  2. Click the database name to expand and show all tables
  3. Scroll to the bottom of the table list
  4. Check “Check All” to select all tables
  5. From “With selected” dropdown, choose “Export”
  6. Click “Go” button

Export Database

⚠️ Critical Warning: Be extremely careful with the dropdown menu. Selecting “Drop” instead of “Export” will DELETE your entire database. Always double-check that “Export” is selected before clicking “Go”.

Export Settings

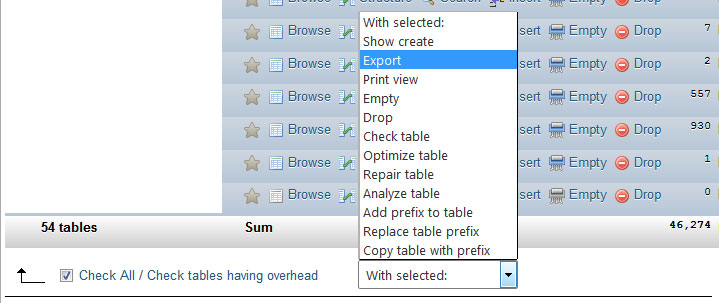
On the export screen, use these recommended settings:

  • Export Method: Quick (for most cases)
  • Format: SQL
  • Compression: gzipped (for large databases)

Importing/Restoring a Database

To restore a database backup:

  1. Select your database in phpMyAdmin
  2. Click “Import” tab at the top
  3. Click “Choose File” and select your backup
  4. Ensure format is set to “SQL”
  5. Click “Go” to import

Note: For large databases, you may need to:

  • Drop (delete) existing tables first to avoid conflicts
  • Increase PHP upload limits if file is too large
  • Use compression (gzip) to reduce file size

For detailed database restoration instructions, see: Database Backup Guide

WordPress-Specific Backup Considerations

WordPress sites require special attention due to their dynamic nature and frequent updates.

What to Backup

A complete WordPress backup includes:

  • WordPress Files: Core files, themes, plugins, uploads
  • Database: Posts, pages, comments, settings, users
  • .htaccess file: Often contains important redirects and settings
  • wp-config.php: Contains database connection details

Before Updates

Platform Updates (WordPress core):

  • Backup both files AND database
  • Core updates can affect both components
  • Older themes may break with major updates

Plugin Updates:

  • Database backup is usually sufficient
  • Plugin files can be reinstalled if needed
  • To disable a problem plugin: rename its folder via FTP

Theme Updates:

  • Backup files if you’ve made customizations
  • Consider using a child theme for custom code
  • Database backup recommended for widget settings

WordPress Backup Plugins

While manual backups are important, these plugins can automate the process:

Recommended Free Plugins:

  • UpdraftPlus: Schedule automatic backups to cloud storage
  • BackWPup: Comprehensive backup with multiple destination options
  • Duplicator: Great for migrations and full site copies

Premium Solutions:

  • VaultPress/Jetpack Backup: Real-time backups by Automattic
  • BlogVault: Incremental backups with staging features
  • WP Time Capsule: Incremental backups like Apple Time Machine
Best Practice: Use plugin backups for convenience, but maintain manual backups as your primary recovery method. Plugins can fail or become compromised, so having independent backups ensures you’re never locked out.

Recovery Planning

Test your backup recovery process before you need it:

  1. Create a test subdomain or local environment
  2. Practice restoring both files and database
  3. Document your recovery steps
  4. Note how long the process takes
  5. Keep recovery instructions with your backups

Common Backup Issues & Solutions

Solutions to frequent backup problems and error messages.

File Size Limitations

Problem: Backup file too large to download or upload

Solutions:

  • Use compression (zip or gzip format)
  • Backup in segments (separate files and database)
  • Exclude large folders like cache or backup directories
  • Use FTP for large file transfers instead of HTTP
  • Consider command-line tools if available (SSH access)

Timeout Errors

Problem: Backup process times out before completion

Solutions:

  • Use File Manager to create compressed archives first
  • Backup during low-traffic hours
  • Break large backups into smaller chunks
  • Contact host to increase PHP timeout limits
  • Use backup plugins with resume capability

Database Import Errors

Problem: Database won’t import or shows errors

Solutions:

  • Check file size against phpMyAdmin limits
  • Ensure database name matches wp-config.php
  • Drop existing tables before importing
  • Verify character encoding matches (usually UTF-8)
  • Use command line MySQL if available

Corrupted Backups

Problem: Backup files won’t extract or are damaged

Prevention:

  • Verify backups immediately after creation
  • Use checksums to verify file integrity
  • Keep multiple backup copies
  • Test restore process periodically
  • Use reliable transfer methods (avoid interrupted downloads)

Storage Issues

Problem: Running out of space for backups

Solutions:

  • Rotate old backups (keep last 3-5 versions)
  • Use incremental backups for large sites
  • Store backups off-server
  • Compress backups before storage
  • Clean up temporary backup files on server

Permission Errors

Problem: Can’t create or access backup files

Solutions:

  • Check file/folder permissions (usually 755 for folders, 644 for files)
  • Ensure correct ownership (user/group)
  • Verify FTP user has necessary privileges
  • Contact host if permissions keep resetting
Still Having Issues? Contact your hosting provider’s support team. Most backup-related problems are server-specific and they can provide direct assistance with their backup tools and limitations.

Need Backup Assistance?

Regular backups are your insurance policy against data loss, hacking, and update failures. If you need help setting up an automated backup system, recovering from a failed update, or implementing a comprehensive backup strategy, please don’t hesitate to reach out. Remember: it’s not a matter of if you’ll need a backup, but when.